---
source_url: "https://microsoft.github.io/quick-authentication/docs/quick-authentication-how-to.html?utm_source=openai"
title: "Sign in Microsoft account users to single-page apps with Microsoft Quick Authentication | quick-authentication"
mirrored_at: 2026-08-25T01:01:01.079Z
host: microsoft.github.io
cited_in_42a: true
mirror_canonical: "https://index.42a.ai/microsoft.github.io/quick-authentication/docs/quick-authentication-how-to.html__q__utm_source_openai"
---
> **Original source:** https://microsoft.github.io/quick-authentication/docs/quick-authentication-how-to.html?utm_source=openai
## Sign in Microsoft account users to single-page apps with Microsoft Quick Authentication
| [_Getting Started_](https://microsoft.github.io/quick-authentication/docs/quick-authentication-how-to.html)| [Reference](https://microsoft.github.io/quick-authentication/docs/quick-authentication-reference.html) | |–|–|
Microsoft Quick Authentication is a lightweight JavaScript library that makes it easier to add **Sign in with Microsoft** support to a single-page app (SPA). Quick Authentication uses the Microsoft Authentication Library for JavaScript (MSAL.js) to handle authentication and authorization for users with personal Microsoft accounts from Outlook, OneDrive, Xbox Live, and Microsoft 365.
## How it works
To enable Quick Authentication, you first add a reference to the library in a `
```
## Choose an integration method: HTML or JavaScript
There are two ways to add Quick Authentication to your app:
- **HTML**: If have access to the application’s HTML, [add the sign-in button in HTML](#option-1-add-sign-in-button-via-html).
- **JavaScript**: If you don’t have access to the HTML, [add the sign-in button with JavaScript](#option-2-add-sign-in-button-via-javascript).
## Option 1: Add sign-in button via HTML
If you have access to adjust your application’s HTML, this approach offers a declarative way to configure Quick Authentication.
### 1\. Configure the library
Add the configuration `div` to your page:
```
```
- Set `data-client_id` to the Application (client) ID of the application registration.
- Set `data-callback` to the name of the JavaScript function you’d like called when a user is authenticated
- Set `data-login_uri` to the redirect URI for Single-page application (SPA) you entered in your application registration in the Azure portal. If this value isn’t set, then for application https://abc.com, Quick Authentication library will use https://abc.com/blank.html as the default.
- `data-callback` should be a string, which represents a function, which is present in JavaScript on the web-page. Else initialization will fail.
You’ll need to write JavaScript code to receive the authentication event and handle completing the registration and sign-in processes. We’ll discuss how to do that, below.
### 2\. Inject the sign-in button
Place a `div` in your authentication component to indicate where Quick Authentication should render the button:
```
```
For details about modifying the sign-in button’s appearance and the prompt’s appearance and behavior, see the [Quick Authentication library reference](https://microsoft.github.io/quick-authentication/docs/quick-authentication-reference.html).
## Option 2: Add sign-in button via JavaScript
Use this approach if you don’t have the ability to modify the application’s HTML.
### 1\. Configure the library
Configuration of the Quick Authentication library can safely happen when the page has finished loading, by calling `ms.auth.initialize` and passing it a configuration object:
```
window.onload = function () {
const result = ms.auth.initialize({
client_id: '',
callback: ,
login_uri: '',
cancel_on_tap_outside: false
});
if (result.result == 'success') {
// Proceed.
} else {
// Initialization failed.
console.error('ms.auth.initialize failed: ', result);
}
};
```
- Set `client_id` to the Application (client) ID of the application registration.
- Set `callback` to the name of the JavaScript function you’d like called when a user is authenticated.
- Set `login_uri` to the redirect URI you entered in your application registration in the Azure portal. If this property isn’t set, then for application https://abc.com, Quick Authentication library will use https://abc.com/blank.html as the default.
If `ms.auth.initialize` succeeds, it returns `{result: 'success'}`. If `ms.auth.initialize` fails, it returns `{result: 'failure', reason: }`.
The following are some possible reasons for failure:
- Initialization was called more than once. Here API returns `{result: 'failure', reason: 'Library already initialized'}`.
- `callback` isn’t a valid function or `client_id` isn’t set. In these cases, API returns `{result: 'failure', reason: 'Invalid configuration'}`.
You’ll need to write JavaScript code to receive the authentication event and handle completing the registration and sign-in processes. We’ll discuss how to do that, below.
[Quick Authentication can be configured](https://microsoft.github.io/quick-authentication/docs/quick-authentication-reference.html) to allow more control over the behavior of the library.
### 2\. Inject the button
To render a sign-in button, call the following JavaScript just after initializing the library (shown above):
```
ms.auth.renderSignInButton(
document.getElementById(''),
{} // Using default options.
);
```
You’ll need to identify the DOM node that you want the library to insert the button into. If DOM node is `null` or `undefined` because it wasn’t found, then this API will throw exception.
Quick Authentication allows you to [customize the look and feel of the button](https://microsoft.github.io/quick-authentication/docs/quick-authentication-reference.html#customizing-the-sign-in-button) to better align with your application’s design. We’ll discuss more about customizing the look and feel of the button, below.
## Responding to authentication events
When an authentication event occurs, the Quick Authentication library calls the `callback` function you specified in the configuration, passing in a [SignInAccountInfo](https://microsoft.github.io/quick-authentication/docs/quick-authentication-reference.html#data-type-signinaccountinfo) object containing the user’s account details as a parameter. If sign-in fails, then [SignInAccountInfo](https://microsoft.github.io/quick-authentication/docs/quick-authentication-reference.html#data-type-signinaccountinfo) will be `null` and the second argument [SignInErrorInfo](https://microsoft.github.io/quick-authentication/docs/quick-authentication-reference.html#data-type-signinerrorinfo) will contain details about the error. If sign-in succeeds, [SignInErrorInfo](https://microsoft.github.io/quick-authentication/docs/quick-authentication-reference.html#data-type-signinerrorinfo) will be `null`.
```
function myCallback(signInAccountInfo, signInErrorInfo) {
console.log(signInAccountInfo);
if (!signInAccountInfo) {
// Sign in failed. signInErrorInfo will be non-null.
const errorCode = signInErrorInfo.errorCode; // Short string.
const errorMessage = signInErrorInfo.errorMessage; // Longer string.
console.log(`sign in failed: errorCode: ${errorCode}, errorMessage: ${errorMessage}`);
return;
}
// Sign-in succeeded. Use signInAccountInfo in sign in/up logic.
}
```
The [SignInAccountInfo](https://microsoft.github.io/quick-authentication/docs/quick-authentication-reference.html#data-type-signinaccountinfo) object includes the following properties:
- `fullName` - the user’s full name
- `surname` - the user’s surname
- `givenName` - the user’s given name
- `username` - the user’s email address or phone number
- `email` - the user’s email address
- `photoUrl` - a base64-encoded dataURI representing the user’s avatar
- `id` - an ID that is unique across all Microsoft accounts. This id can be used for some Microsoft Graph APIs (e.g., [User GET](https://learn.microsoft.com/en-us/graph/api/user-get?view=graph-rest-1.0&tabs=http)).
- `homeAccountId` - the user’s home account identifier which is used by MSAL
- `idToken` - [ID token](https://docs.microsoft.com/en-us/azure/active-directory/develop/id-tokens) received during sign-in process
We recommend using either `id` or `homeAccountId` as a key, rather than the email address, because an email address isn’t a unique account identifier. It’s possible for a user to use a Gmail address for a Microsoft Account, and to potentially create two different accounts (a Microsoft account and a Google account) with that same email address. It’s also possible for a Microsoft Account user to change the primary email address on their account.
The callback on sign-in failure comes through for attempts to sign-in with a) button b) sign-in prompt c) [ms.auth.startSignIn](https://microsoft.github.io/quick-authentication/docs/quick-authentication-reference.html#method-msauthstartsignin) API.
As an example of [SignInErrorInfo](https://microsoft.github.io/quick-authentication/docs/quick-authentication-reference.html#data-type-signinerrorinfo), if user cancels out of the sign-in flow, they will get the following error info object.
```
{
errorCode: 'user_cancelled',
errorMessage: 'User cancelled the flow'
}
```
## Signing out
Use `ms.auth.signOut()` to sign out a user:
```
ms.auth.signOut(homeAccountId, function (result) {
if (result.result) {
// Finish the logout process in your application.
} else {
console.log('Sign out failed, error: ', result.error);
}
});
```
You’ll need to pass in `homeAccountId` field of `AccountInfo` object you received as part of the authentication event and a callback to receive the result of the `signOut()` call. The argument returned to the callback will be an object with the following structure:
- `result` - `true` if the user was signed out, `false` if not
- `error` - if `result==false`, will be an object with a `message` property explaining the error
## Advanced: Querying authentication status
You can determine if the current user is signed-in by calling `ms.auth.startGetCurrentAccount()` and passing in the name of a callback function that is ready to receive the account information:
```
function accountCallback(account_info) {
if (account_info) {
// Use account.
}
}
ms.auth.startGetCurrentAccount(accountCallback);
```
When called, `startGetCurrentAccount()` will trigger the callback and pass in a value. If the user is signed-in, the argument will be an [AccountInfo](https://microsoft.github.io/quick-authentication/docs/quick-authentication-reference.html#data-type-accountinfo) object. If the user isn’t signed-in, the argument will be `null`.
## Customizing the Quick Authentication experience
To fully control your users authentication experience, build and maintain your own button to trigger the sign-in flow.
### Start the sign-in process
To begin the sign-in process when a user activates your custom button, you’ll need to call `ms.auth.startSignIn()`:
```
button.addEventListener('click', function() {
ms.auth.startSignIn();
});
```
As with the previous examples, successful authentications will be routed into the callback you defined when initializing the library.
`ms.auth.startSignIn` can also be called with additional parameters to change the callback behavior. Check [API documentation](https://microsoft.github.io/quick-authentication/docs/quick-authentication-reference.html#method-msauthstartsignin) for more info.
### Show the sign-in prompt
If you want to control the display of the enhanced sign-in prompt in Microsoft Edge, use the `ms.auth.prompt()` method:
```
ms.auth.prompt('right', function(notification) {
const reason = notification.reason;
if (notification.type === 'display' && !notification.displayed) {
if ( reason === 'browser_not_supported' ) {
console.log('prompt not supported in browser');
}
} else if (notification.type === 'skipped') {
if (reason === 'user_cancel') {
console.log('user cancelled');
}
} else if (notification.type === 'dismissed') {
if (reason === 'credential_returned') {
console.log('Got sign-in credentials');
}
}
});
```
This method may be called with no arguments to use the default configuration. You may also supply the following arguments to customize its appearance and/or respond to specific user interactions with the prompt.
The first argument is the position. By default, the prompt is rendered on the left. You can position it “center” or “right” as well.
The second argument is a callback function that receives notifications from the prompt, based on user interactions. The callback receives a [PromptMomentNotification](https://microsoft.github.io/quick-authentication/docs/quick-authentication-reference.html#data-type-promptmomentnotification) object when the user interacts with it.
### Close the sign-in prompt
If you want to close the enhanced sign-in prompt in Microsoft Edge, use the `ms.auth.cancel()` method:
```
ms.auth.cancel();
```
### Exponential cool-down for the sign-in prompt
If the user closes the sign-in prompt manually, the sign-in prompt is suppressed. A user closes sign-in prompt when they tap Close (**X**) in the top-right corner of the prompt or when they close it by pressing Escape key. When the user closes the sign-in prompt, it won’t display in the same browser for that application for sometime. This duration is called the cool-down period.
Consecutive closures of
sign-in prompt
Cool-down period
(sign-in prompt disabled)
1
Two (2) hours
2
One (1) day
3
One (1) week
4+
Four (4) weeks
The cool-down status will reset after a successful sign-in.
### Prompt’s interaction with other sign-in methods
When prompt is open and sign-in is initiated using button or calling [ms.auth.startSignIn](https://microsoft.github.io/quick-authentication/docs/quick-authentication-reference.html#method-msauthstartsignin), then the prompt will close. If [PromptMomentNotification](https://microsoft.github.io/quick-authentication/docs/quick-authentication-reference.html#data-type-promptmomentnotification) callback is used, then the callback will be invoked with `{type: 'dismissed', reason: 'flow_restarted'}`.
## Working with access tokens
Quick Authentication surfaces the access token request APIs in MSAL.js. For details and example code for calling these methods, see [Microsoft Quick Authentication configuration and JavaScript API reference](https://microsoft.github.io/quick-authentication/docs/quick-authentication-reference.html).
Call these methods in the following order to get an access token:
1. Call [ms.auth.getMSALAccount](https://microsoft.github.io/quick-authentication/docs/quick-authentication-reference.html#method-msauthgetmsalaccount).
2. Attempt to to get an access token silently with [ms.auth.acquireTokenSilent](https://microsoft.github.io/quick-authentication/docs/quick-authentication-reference.html#method-msauthacquiretokensilent).
3. If the silent call fails, call [ms.auth.acquireTokenPopup](https://microsoft.github.io/quick-authentication/docs/quick-authentication-reference.html#method-msauthacquiretokenpopup) to display the sign-in window.
## Logging
To help in troubleshooting and debugging errors in your apps that use Microsoft Quick Authentication, enable event logging.
To enable Quick Authentication event logging, add the [`autoLogEvents`](https://microsoft.github.io/quick-authentication/docs/quick-authentication-reference.html#logging-with-autologevents) query parameter when you include the _ms\_auth\_client.min.js_ script.
```
```
To also enable logging for MSAL.js, add the [`logMsalEvents`](https://microsoft.github.io/quick-authentication/docs/quick-authentication-reference.html#msal-logging-with-logmsalevents) query parameter in addition to `autoLogEvents`:
```
```
If ux\_mode is set to `'popup'` (which is the default), then on clicking the sign-in button or sign-in prompt, the credential / consent dialog opens up in a popup.
The popup will be redirected by MSA server to redirect URI [registered above](#register-your-application) and specified in quick authentication configuration using [login\_uri](https://microsoft.github.io/quick-authentication/docs/quick-authentication-reference.html#data-type-initconfiguration) or [data-login\_uri](https://microsoft.github.io/quick-authentication/docs/quick-authentication-reference.html#specifying-the-quick-authentication-initialization-parameters), once the credential entry / consenting process is completed on the server side. The redirection URL will contain a fragment with info needed by quick authentication to complete the sign-in process in client side.
Quick authentication **needs** the domain of the page which included our library to be the same as domain of the redirect URI specified.
After server redirection, once quick authentication detects that the domain is same as the domain which loaded its Javascript library, it will close the popup and complete the sign-in process on the client side.
This means that the user does not get an opportunity to see the redirect URI page. Hence we suggest using a blank.html page as redirect URI.
## Redirect mode
In redirect mode, quick authentication does a full page redirection to MSA sign-in page.
If this MSA webpage sign-in is successful, a POST request will be sent to your server, as opposed to calling the Javascript callback in your web application.
Your server needs to handle the POST request and fetch user account information. Check [this](#redirect-mode-flow-of-control) and [this](#completing-the-flow-on-your-server-to-get-user-profile-info) section below for more information.
### Enabling your application for redirection
#### 1\. Add redirect URI in application registration
- In “Authentication” tab of your application’s registration, click “Add a platform”.
- Then select “Web”.
- Then add a Redirect URI.
#### 2\. Add a secret in application registration
- In “Certificates & secrets” tab of your application’s registration, click “New client secret”.
- Add the secret and then keep a copy of the “Value” field.
- This secret in “Value” field will be used later from your server to handle redirection flow.
#### 3\. Configure application for redirection in quick authentication
In quick authentication configuration:
- `redirect_uri` needs to be set to redirect URI added in [this step](#1-add-redirect-uri-in-application-registration).
- `ux_mode` needs to be set to `'redirect'`.
Here’s how to do it in HTML initialization:
```
```
Here’s how to do it in Javascript initialization:
```
window.onload = function () {
const result = ms.auth.initialize({
client_id: '',
callback: ,
login_uri: '',
redirect_uri: '', // Needed for redirect.
ux_mode: 'redirect', // Needed for redirect.
cancel_on_tap_outside: false
});
if (result.result == 'success') {
// Proceed.
} else {
// Initialization failed.
console.error('ms.auth.initialize failed: ', result);
}
};
```
### Optional properties for redirect mode
[redirect\_state](https://microsoft.github.io/quick-authentication/docs/quick-authentication-reference.html#redirect_state) is an optional property.
### Sign-in prompt in redirect mode
- On clicking on “Continus as” button, the Javascript callback is not called.
- Quick authentication does a full page redirection to MSA server. Check [this section](#redirect-mode-flow-of-control) for more details.
### Sign-in button in redirect mode
- On clicking on sign-in button, the Javascript callback is not called.
- Quick authentication does a full page redirection to MSA server. Check [this section](#redirect-mode-flow-of-control) for more details.
### `ms.auth.startSignIn` in redirect mode
- On calling [ms.auth.startSignIn](https://microsoft.github.io/quick-authentication/docs/quick-authentication-reference.html#method-msauthstartsignin), the Javascript callback is not called.
- Quick authentication does a full page redirection to MSA server. Check [this section](#redirect-mode-flow-of-control) for more details.
### Redirect mode flow of control
- On clicking button or calling [ms.auth.startSignIn](https://microsoft.github.io/quick-authentication/docs/quick-authentication-reference.html#method-msauthstartsignin), quick authentication does a full page redirection to MSA server to give user the opportunity to sign-in.
- If user sign-in succeeds, then MSA server sends a `POST` request to the `redirect_uri` specified by [quick authentication configuration](#3-configure-application-for-redirection-in-quick-authentication).
- This POST request contains following JSON:
```
{
code: 'code-as-string-sent-by-msa-server'
state: 'redirect_state-which-was-specified'
}
```
- `state` will not be sent if it was not specified using [redirect\_state](https://microsoft.github.io/quick-authentication/docs/quick-authentication-reference.html#redirect_state).
- Your application’s server code serving the `redirect_uri` should use the `code` to complete [rest of the flow](#completing-the-flow-on-your-server-to-get-user-profile-info).
### Completing the flow on your server to get user profile info
#### 1\. Fetch access token by exchanging code
- If `state` was sent, ensure that it matches the expectation.
- Make a request to fetch access token using client secret as [documented here](https://learn.microsoft.com/en-us/azure/active-directory/develop/v2-oauth2-auth-code-flow#request-an-access-token-with-a-client_secret).
- `client_secret` field is the value from your [application’s registration](#2-add-a-secret-in-application-registration).
- Your request needs to set the following fields:
- `client_id`
- `scope`: Example “openid profile User.Read offline\_access”. This should be url encoded.
- `code`: The code which was obtained in the POST as mentioned above.
- `redirect_uri`: The redirect URI which [was registered](#1-add-redirect-uri-in-application-registration).
- `grant_type`: Use value `authorization_code`.
- `client_secret`: The “Value” field of [secret](#2-add-a-secret-in-application-registration) from your application registration.
Here’s a sample:
```
// Line breaks for legibility only
POST /consumers/oauth2/v2.0/token HTTP/1.1
Host: https://login.microsoftonline.com
Content-Type: application/x-www-form-urlencoded
client_id=6731de76-14a6-49ae-97bc-6eba6914391e
&scope=openid%20profile%20User.Read%20offline_access
&code=OAAABAAAAiL9Kn2Z27UubvWFPbm0gLWQJVzCTE9UkP3pSx1aXxUjq3n8b2JRLk4OxVXr...
&redirect_uri=http%3A%2F%2Flocalhost%2Fmyapp%2F
&grant_type=authorization_code
&client_secret=JqQX2PNo9bpM0uEihUPzyrh // NOTE: Only required for web apps. This secret needs to be URL-Encoded.
```
- If the call succeeds, it will return a successful response like [this](https://learn.microsoft.com/en-us/azure/active-directory/develop/v2-oauth2-auth-code-flow#successful-response-2).
#### 2\. Fetch more info using graph API
Use the access token to call [GET USER API](https://learn.microsoft.com/en-us/graph/api/user-get?view=graph-rest-1.0&tabs=http) to get user information.
#### 3\. Fetch image using graph API
Use the access token to call [photo API](https://learn.microsoft.com/en-us/graph/api/profilephoto-get?view=graph-rest-1.0) to get photo of the user.
## Troubleshoot specific errors
To ease your troubleshooting and debugging efforts, start by enabling event logging as described in [Logging](#logging).
If during sign-in flow, your application runs into following error:
```
We're unable to complete your request
unauthorized_client: The client does not exist or is not enabled for consumers. If you are the application developer, configure a new application through the App Registrations in the Azure Portal at https://go.microsoft.com/fwlink/?linkid=2083908.
```
Then check your application registration and in “Overview” tab check the value of “Supported account types”. If it’s not “Personal Microsoft account user”, then this error can show up.
To fix this issue, you can “Delete” your application registration and recreate a new one with “Supported account types” set to “Personal Microsoft account user”.
### Running into “redirect\_uri not valid” error
If during sign-in flow, your application runs into following error:
```
We're unable to complete your request
invalid_request: The provided value for the input parameter 'redirect_uri' is not valid. The expected value is a URI which matches a redirect URI registered for this client application.
```
Then check your application registration and in “Authentication” tab check the value in “Platform configurations”. If “Single-page application” isn’t present as a platform and it’s “Redirect URIs” aren’t specified, then this error can show up.
To fix this issue, select “Add a platform”. Then select “Single page application”. Then add “Redirect URIs”. If your application is “https://www.myapplication.com”, we recommend setting “https://www.myapplication.com/blank.html” and serve a blank webpage from that location.
Also, **don’t select** any option under “Implicit grant and hybrid flows”.
### Callback function not getting called after successful sign-in
If after completing sign-in flow the JavaScript callback function isn’t getting called, then check the initialization code.
If div `"ms-auth-initialize"` is used to initialize Quick Authentication library, check whether the `data-callback` argument has been set correctly. For a JavaScript callback function like below:
```
function handleSignInResponse(accountInfo) {
// Use accountInfo.
}
```
The correct way of setting callback is shown in the following snippet:
```
```
The following snippet is incorrect:
```
```
Notice the `()` at the end, which causes the problem.
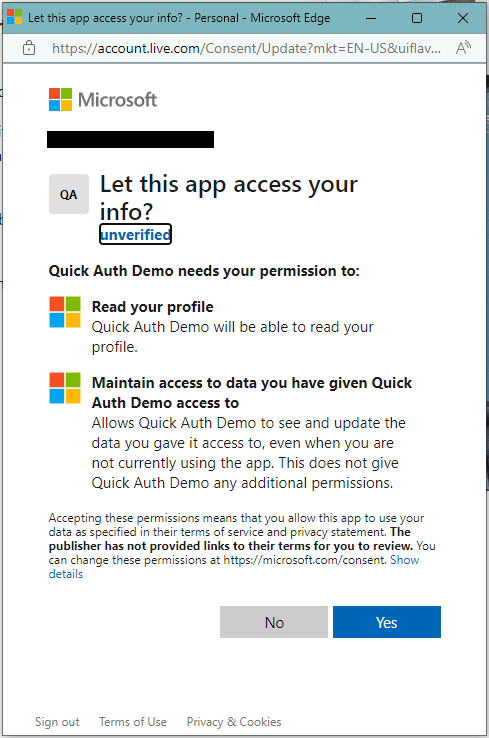
### Application showing up as “unverified”.
If your application shows up as “unverified” as in the image below, please look at [this document](https://microsoft.github.io/quick-authentication/docs/partner-business-verification.html) on steps of how to resolve it.
## Next steps
For more details about prompt configuration and API reference, see [Microsoft Quick Authentication configuration](https://microsoft.github.io/quick-authentication/docs/quick-authentication-reference.html).
For best practices for integration, see [this document](https://microsoft.github.io/quick-authentication/docs/quick-authentication-web-integration-best-practices.html).